Greater Midwest Foodways Alliance
FAMILY HEIRLOOM RECIPES
Contestants entered their best scratch family heirloom recipe suitable for a family or community dinner. Recipe should originate before 1950.
Contestants brought a prepared dish along with a brief story of who passed the recipe down to them, ethnicity, if relevant, number of years the recipe has been in their family and any interesting information about their recipe.
JUDGING CRITERIA
Taste: 50%
History: 40%
Appearance: 10%
Premiums sponsored in partnership with Feedstuffs FoodLink.com

1st place – $150., 2nd place – $100., 3rd place – $50

Pampered Chef is sponsoring additional prizes for our winners:
First place: Reversible Bamboo Carving Board (Value = $72)
Second place: Cool & Serve Square Tray, Outdoor Mini Spoons & Tongs Set (Value = $49)
Third place: Food Chopper (Value = $31)
Competition was conducted on August 19th, these are the results:
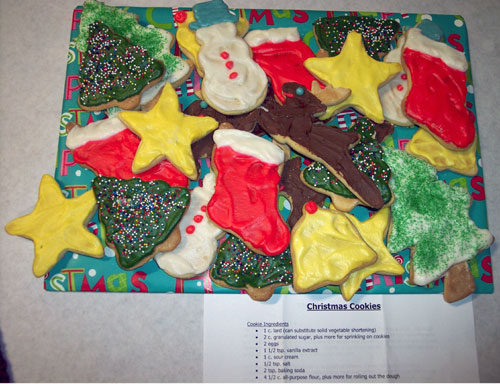
Christmas Cookies (Image by Wanda Bain)
The Christmas Cookie
Leigh Walter, Prior Lake, Minnesota
My Mother remembers her Oma making these cookies when she was a child. Although at that time, they were not Christmas cookies. She would bake these cookies whenever she had sour cream in the house and the dough was balled and pressed flat with a glass dipped in sugar. No cute cut-outs, frosting or sprinkles but my Mother recalls how she enjoyed eating these cookies throughout the year.
As I was young when my Great Grandmother passed, I only remember these as Christmas cookies. My Grandmother must have had cookie cutters for every Christmas shape imaginable and this was the only time of the year the recipe was made. When you arrived at the house for Christmas, the cookies were waiting. I can’t imagine how much time it took to make all of those different designs. Each cookie was sugared on one side, frosted on the other (appropriately for it’s design with colored icing) and topped with candy sprinkles as needed (they were always needed). Now you would think that after this much time was spent making these cookies you would take extra care storing them ….. if that extra care was stacking them in ice cream pails in the breezeway, you’d be right! For as long as I can remember, the Christmas cookies were always stored in ice cream pails; in the breezeway on the farm or the garage when they moved to town.
The recipe remains the same today however; my Grandmother made these cookies, and the icing, a lot thinner than I do now. I have also been known to occasionally go out on a limb and include other cookie cutter worthy holidays as Halloween (giant pumpkins), Valentine’s Day (hearts) and Easter (bunnies). When it comes to the Christmas cookie, I limit myself to a couple designs. Too much work to make more than that. …. but not for her. My Mother told me that even well into her 80’s she would want to make every design. If you tried to suggest limiting her to stars and trees; she would say, but we have to do ornaments and reindeer and Santa’s and so on.
This recipe is by far my most requested for cookies. In an attempt to compel me to make them throughout the year, I have been offered numerous cookie cutters for additional holidays; or for days that aren’t really holidays like election day. PS- Elephants and Donkeys? Does anyone really want me to try and make gray icing? Thanks but no thanks, I’ll stick with Christmas as to me they will always be ‘Christmas Cookies’.
Christmas Cookies
Leigh Walter, Prior Lake, Minnesota
Cookie Ingredients
1 c. lard (can substitute solid vegetable shortening)
2 c. granulated sugar, plus more for sprinkling on cookies
2 eggs
1 1/2 tsp. vanilla extract
1 c. sour cream
1/2 tsp. salt
2 tsp. baking soda
4 1/2 c. all-purpose flour, plus more for rolling out the dough
Frosting Ingredients
1/2 c. unsalted butter, softened
1 tsp. vanilla extract
3-6 tbs. milk
up to 2 lbs of powdered sugar (dependant on how thick or thin you would like your frosting)
Food Coloring, Sprinkles, Cocoa (optional)
Cookie Directions
Cream the lard and sugar with an electric mixer. Add the eggs, one a time, mixing well after each. Add the vanilla extract, sour cream and salt and mix well. Add the flour and mix until combined.
Although you can roll out the dough right away, I prefer to chill it for (2) hours.
Preheat the oven to 350 degrees and line baking sheets with parchment paper.
Working with small amounts of dough, lightly flour your work space and roll the dough to your desired thickness. My Grandmother and Mother roll the dough very thin which yields a crisper cookie. I like to roll it thicker which yields a softer cookie. Use cookie cutters to cut desired shapes.
Place on the baking sheet, sprinkle with granulated sugar and bake for (8) minutes. Remove from the sheet and cool on a wire rack.
Frosting Directions
Using an electric mixer, mix the butter and vanilla extract. Slowly add the powdered sugar. When the mixture appears dry, add the milk (1) tbs. at a time and then resume adding the remaining powdered sugar until you reach the consistency that you prefer.
Once mixed, divide the frosting into small bowls and add your food coloring (i.e. green for Christmas trees) or cocoa (for Reindeer). You can stir in candy sprinkles if desired (i.e. multicolored sprinkles in the green so the Christmas tree will have “lights”).
Frost the non-sugared side of the cookie …. that way both sides look pretty!
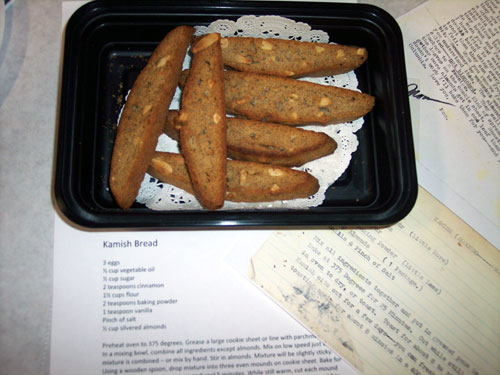
Kamish (Image by Wanda Bain)
Kamish
Elizabeth Paetow, Montrose, Minnesota
My paternal grandmother taught my mother how to make Kamish Bread, a k a “Mandelbrot,” which is German/Yiddish for “almond bread.” My paternal grandfather came to the U.S. from the Ukraine in the early 1900’s and (family) legend has it that he called it “kamishbrot” and my grandmother updated it to Kamish Bread.
“Kamish Bread” means “almost bread” and is similar to biscotti; it’s also twice-baked but not quite as crunchy. This Ashkenazi Jewish dessert dates back to the early 19th century in Eastern Europe. With no butter added, they were popular because they kept well.
My grandmother came to the U.S. with her family from Romania on the Lusitania in 1912 -a year before the ship sank. She rarely followed a recipe – just a little bit of this and a little bit of that – so when we wanted her recipes, we had to stand next to her with measuring cups/spoons to catch her measurements.
I inherited handwritten recipes from my mother, Great-Aunt Nellie (my grandmother’s youngest sister) and from my grandmother. All had versions of the Kamish Bread recipe I make. I was a newlywed in 1974 when I asked my mother for the recipe (see attached).
My grandmother died in 2001 six weeks shy of her 102nd birthday. My mother died in 2008 at 85. There are many Kamish Bread variations with walnuts, cinnamon, chocolate chips or dried fruit added but even though I’m not an almond fan, I carryon the family tradition!
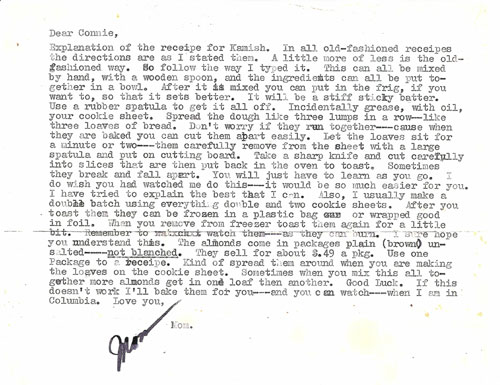
Dear Connie,
Explanation of the receipe for Kamish. In all old-fashioned receipes the directions are as I stated them. A little more of less is the old fashioned way. So follow the way I typed it. This can all be mixed by hand, with a. wooden spoon, and the ingredients can all be put together in a bowl. After it is mixed you can put in the frig, if you want to, so that it sets better. It will be a stiff sticky batter. Use a rubber spatula to get it all off. Incidentally grease, with oil, your cookie sheet. Spread the dough like three lumps in a row-like three loaves of bread. Don’t worry if they ran together—cause when they are baked you can cut them apart easily. Let the loaves sit for a minute or two–them carefully remove from the sheet with a large spatula and put on cutting board. Take a sharp knife and cut carefully into slices that are then put back in the oven to toast. Sometimes they break and fall apart. You will just have to learn as you go. I do wish you had watched me do this–it would be so much easier for you. I have tried to explain the best that I can. Also, I usually make a double batch using everything double and two cookie sheets. After you toast them they can be frozen in a plastic bag or wrapped good in foil. When you remove from freezer toast them again for a little bit. Remember to watch them — as they can burn. I sure hope you understand this. The almonds come in packages plain (brown) unsalted–not blanched. They sell for about $.49 a pkg. Use one package to a receipe. Kind of spread them around when you are making the loaves on the cookie sheet. Sometimes when you mix this all together more almonds get in one loaf then another. Good Luck. If this doesn’t work I’ll bake them for you—and you can watch—when I am in Columbia. Love you,
Mom
Kamish
Elizabeth Paetow, Montrose, Minnesota
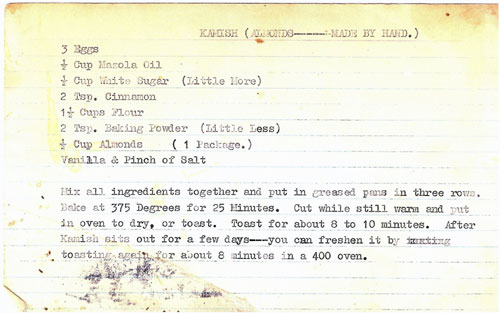
KAMISH (ALMONDS—– MADE BY HAND)
3 Eggs
1/2 Cup Mazola Oil
1/2 Cup white sugar (Little more)
2 Tsp. Cinnamon .
1 1/2 Cups Flour
2 Tsp. Baking Powder (LittLe Less)
1/2 Cup Almonds (1 Package)
Vanilla & Pinch of Salt
Mix all ingredients together and put in greased pans in three rows. Bake at 375 Degrees for 25 minutes. Cut while still warm and put in oven to dry, or toast. Toast for about 8 to 10 minutes. After Kamish sits out for a few days—you can freshen it by toasting again for about 8 minutes in a 400 oven.
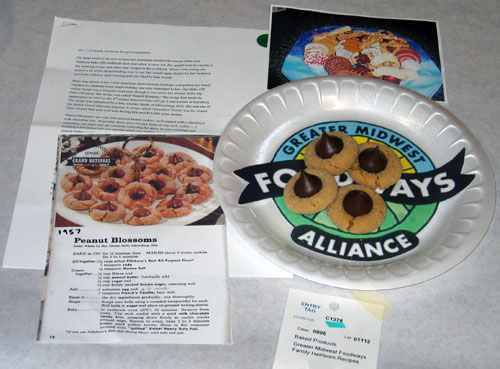
Peanut Blossoms (Image by LoAnn Mockler)
Peanut Blossoms
Karen Cope, Minneapolis, Minnesota
My mom loved to try new recipes and anxiously awaited the arrival of the new Pillsbury Bake-Off cookbook each year when it came out. She would treat her family to the winning recipe and other new recipes in the cookbook. When I was young. she turned a lot of the dessert baking over to me. She would make dinner for her husband and three children each evening and also liked to bake breads.
Mom was proud of her 100% American-born German heritage. and getting her family together to celebrate every major holiday was very important to her. One Bake-Off cookie recipe was a frequent treat even though it was never the winner of the big Bake-Off prize. The recipe was called “Peanut Blossoms. The recipe first made its appearance in 1957 at the 9th Grand National Bake Off (as it was known at that time). The recipe was submitted by a Mrs. Chester Smith of Gibsonburg. Ohio. She was one of the Senior Grand National winners. A recipe called “Accordion Treats” was the Grand Prize winner that year and won the big title and $25.000 prize money.
“Peanut Blossoms” are cute little peanut butter cookies, each topped with a Hershey’s milk chocolate kiss. Hopefully, there were enough kisses to top each cookie — I remember my sister and me carefully removing the shiny tin foil coverings and popping a few kisses into our mouths when our mother wasn’t looking! First you make peanut butter cookie dough, which is rolled into balls and then in granulated sugar. After the cookies are baked, they are topped with the chocolate kiss. The heat of the warm cookie causes the chocolate to melt, but the kiss still retains its signature shape.
The pairing of chocolate with peanut butter is a classic pairing – what’s not to love?
What I find amazing about this recipe is that it’s stood the test of time. Not many people I’ve talked to know that it originated at an early Pillsbury Bake-Off contest 55 years ago, and that it didn’t even win the big prize. I think it easily could be voted as one of the best cookies created in a People’s Choice Award!
Many think of Peanut Blossoms as a holiday cookie. They are usually included on my holiday cookie plates that I make each year now to distribute to my family. friends and neighbors.
My mom is no longer with us, but she passed her love of baking down to me. And, coincidentally. I currently now work for General Mills. the company that acquired Pillsbury back in 2001.
In recent years. The Minnesota State Fair advertised that you could buy an engraved brick as a memorial. and we decided to get one in our mother’s name. Our brick is located by the grandstand and reads “Jeanette Cope, She loved kittens. lilacs. and fairs and we loved her.” How fitting is it that a recipe she taught me to make many years is back at the 2012 Minnesota State Fair!
Peanut Blossoms
Karen Cope, Minneapolis, Minnesota
1 3/4 cups all-purpose flour
1/2 cup sugar
1/2 cup firmly packed brown sugar
1 teaspoon baking soda
1/2 teaspoon salt
1/2 cup shortening
1/2 cup peanut butter
2 tablespoons milk
1 teaspoon vanilla
1 egg
Sugar
48 Hershey’s Kisses Brand milk chocolates, unwrapped
1. Heat oven to 375°F. In large bowl, combine flour, 1/2 cup sugar, brown sugar, baking soda, salt, shortening, peanut butter, milk, vanilla and egg; mix with electric mixer on low speed until stiff dough forms.
2. Shape dough into 1-inch balls; roll in sugar. Place 2 inches apart on ungreased cookie sheets.
3. Bake at 375°F. for 10 to 12 minutes or until golden brown. Immediately top each cookie with 1 milk chocolate candy, pressing down firmly so cookie cracks around edge; remove from cookie sheets.
Makes 4 dozen cookies
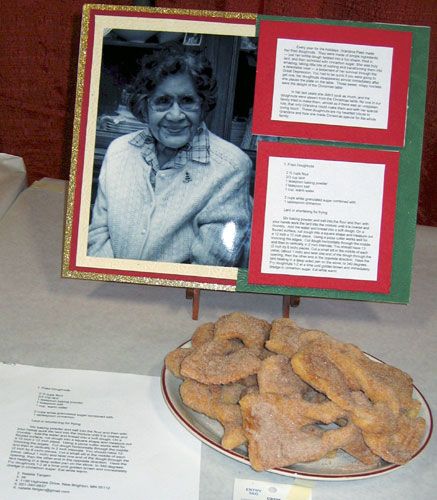
Doughnuts (Image by LoAnn Mockler)
Fried Doughnuts
Natalie Tangen, New Brighton, Minnesota
Every year for the holidays, Granma Paez made her fried doughnuts. They were made of simple ingredients – just her tortilla dough twisted into a fun shape, fried in lard, and then sprinkled with cinnamon sugar. She was truly amazing, taking little bits of nothing and transforming them into a delectable treat – a testament of her survival through the Great Depression. You had to be quick if you were going to get one; her doughnuts disappeared almost immediately after she placed the plate on the table. Those sweet, crispy morsels were the delight of the Christmas table.
In her last years she didn’t cook as much, and the doughnuts were absent from the Christmas table. No one in our family tried to make them, almost as if there was an unspoken rule, that only Grandma could make them and with her special loving touch. These doughnuts are my heartfelt tribute to Grandma and how she made Christmas special for the whole family.
Fried Doughnuts
Natalie Tangen, New Brighton, Minnesota
2 1/2 cups flour
2/3 cup lard
1 teaspoon baking powder
1 cup warm water
2 cups white granulated sugar combined with
1 tablespoon cinnamon
Lard or shortening for frying
Stir baking powder and salt into the flour and then with your hands work the lard into the mixture until it is coarse and crumbly. Add the water and knead into a soft dough. On a floured surface, roll dough into a square shape and measure out a 12 inch x 12 inch piece. Using a pizza cutter works well for trimming the edges. Cut dough horizontally through the middle and then in vertically in 2 inch intervals. You should have 12-(2 inch by 6 inch) pieces. Cut a small slit in the middle of each piece, (about 1 inch) and twist one end of the dough through the opening, then the other end in the opposite direction. Have the lard heating in a deep sided pan on the store, to 340 degrees. Fry doughnuts 1-2 at a time until golden brown and immediately dredge in cinnamon sugar. Eat while warm.
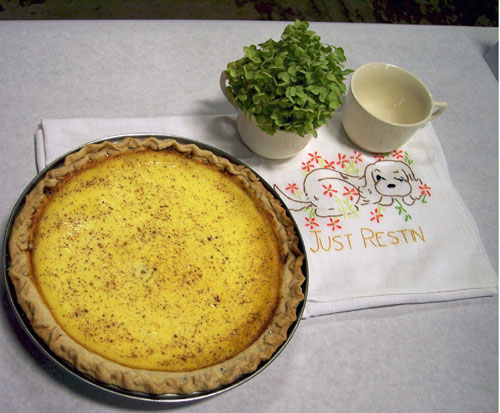
Custard Pie (Image by Wanda Bain)
Custard Pie
Gwendolyn Swenson, North Branch, Minnesota
I remember my mom making pie for dessert. Usually it was a fruit pie with what fruits were availahle, such as cherries or apples from our orchard or blueberry or blackberries from our woods. But if fruit season was over, Mom could make custard pie. The pie is baslcally eggs and milk. Since we lived on a farm, eggs and milk were plentiful all year around.
I remember Mom leaving home to go to a state Farm Bureau contest at Madison, Wisconsin to make custard pie. I do not remember her placing, but she won an iron.
I did not really make this pie much until my grandma went to the nursing home.
Grandma Boettcher would ask for custard pie. The next time I visited I brought her a piece of custard pie. The Grange I belong to has an annual dinner in May with homemade pies for dessert. I once brought custard and now it is asked for each year.
This pie is easy to make and easy to eat. The pie is not complete without the nutmeg. I still make the plecrust with lard as taught and use my mom’s pie pans. I even had my rolling pin repaired. If I have not been home to the farm to get milk from the bulk tank. I do have to buy whole milk and cream. It tastes best though wlth the rich milk straight from the farm. Eggs and milk are not just for breakfast.
Custard Pie
Gwendolyn Swenson, North Branch, Minnesota
4 EGGS. SLIGHTLY BEATEN
1/2 CUP SUGAR
1/4 TSP SALT
1 1/2 TSP VANILLA (Watkins preferred)
1 1/2 CUP MILK, SCALDED
NUTMEG
Thoroughly mix eggs, sugar, salt and vanilla; slowly stir in scalded milk. Pour at once into pie shell. Dust with nutmeg.
Bake in oven at 475 degrees for 5 minutes, then at 425 degrees tor 1O mmutes, or until knife inserted halfway between center and edge of pie comes out clean. Serve cool or chilled.
PIE CRUST
(one crust)
1 cup flour, 1/2 tsp salt, 1/3 cup cold lard, and 2 to 2 1/2 T. cold water
Mix salt with flour. Add lard, mix well with fork. Sprinkle cold water over mixture and mix in. With hands, press mixture into a smooth ball. Flatten ball and roll out crust to fit pie pan. Makes 1 pie shell (8″ or 9″).
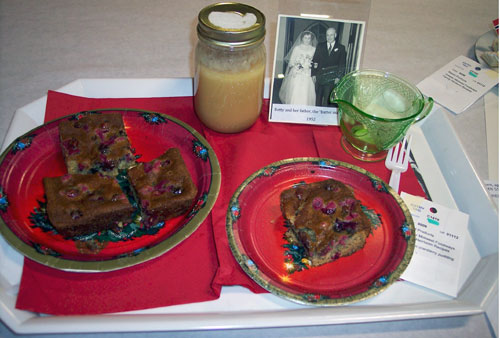
Cranberry Pudding (Image by Wanda Bain)
Cranberry Pudding
Elsie Olsen, Eagan, Minnesota
This recipe was passed down by my sister-in-law, Betty when she married my brother in 1952. Betty was raised in the small town of Harrisville, Wisconsin, the daughter of a local buttermaker in the Harrisville Creamery. The recipe dates back to the depression era when times were hard and families relied on locally produced goods – in this case butter and locally grown cranberries.
I have been making this recipe for over 50 years. My children – and now my grandchildren – consider this their favorite holiday dessert. The traditional plum pudding of Christmas lore has been replaced in our family by Cranberry Pudding.
Cranberry Pudding
Elsie Olsen, Eagan, Minnesota
Cranberry Pudding:
1 1/2 tbsp. butter
1/2 cup sugar
1/4 cup Carnation Milk
1/2 cup water
1 cup flour
1 tsp soda
1/2 tsp salt
1 cup raw cranberries
Mix 1st ingredients in mixing bold
Add dry ingredients. Mix and add 1 cup raw cranberries
Put into 8″ x 8″ baking pan
Bake 25 – 30 min. at 350 deg
Serve with hot butter sauce poured over each piece
Butter Sauce:
1/4 # butter
1 cup sugar
1/2 cup Carnation Milk
1 tsp vanilla
Heat together in a double boiler
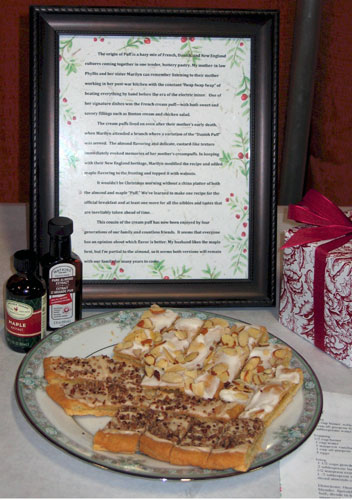
Puff (Image by LoAnn Mockler)
Puff
Lisa Silmser, Champlin, Minnesota
The origin of Puff is a hazy mix of French, Danish, and New England cultures coming together in one tender, buttery pastry. My mother-in-law Phyllis and her sister Marilyn can remember listening to their mother working in her post-war kitchen with the constant “fwap fwap fwap” of beating everything by hand before the era of the electric mixer. One of her signature dishes was the French cream puff – with both sweet and savory fillings such as Boston cream and chicken salad.
The cream puffs lived on even after their mother’s early death, when Marilyn attended a brunch where a variation of the “Danish Puff” was served. The almond flavoring and delicate, custard-like texture immediately evoked memories of her mother’s creampuffs. In keeping with their New England heritage, Marilyn modified the recipe and added maple flavoring to the frosting and topped it with walnuts.
It wouldn’t be Christmas morning without a china platter of both the almond and maple “Puff.” We’ve learned to make one recipe for the official breakfast and at least one more for all the nibbles and tastes that are inevitably taken ahead of time.
This cousin of the cream puff has now been enjoyed for four generations of our family and countless friends. It seems that everyone has an opinion about which flavor is better. My husband likes the maple best, but I’m partial to the almond, so it seems both versions will remain with our family for many years to come.
Puff
Lisa Silmser, Champlin, Minnesota
Pastry
1/2 cup butter, softened
1 cup all-purpose flour
2 tablespoons water
Topping
1/2 cup butter
1 cup water
1 teaspoon vanilla
1 cup all-purpose flour
3 eggs
Icing
1 1/2 cups powdered sugar
2 tablespoons butter, softened
1/2 teaspoon extract – either maple or almond
1 -2 tablespoon warm water
sliced almonds or walnuts depending on extract choice
Directions: Heat oven to 350°F. Cut 1/2 cup softened butter into 1 cup flour, using pastry blender. Sprinkle 2 tablespoons water over mixture; mix with fork. Gather pastry into ball; divide in half. Pat each half into rectangle, 12×3 inches, about 3 inches apart on ungreased cookie sheet.
Heat remaining 1/2 cup butter and 1 cup water to rolling boil in 2-quart saucepan; remove from heat. Quickly stir in vanilla and 1 cup flour. Stir over low heat about 1 minute or until mixture forms a ball; remove from heat. Add eggs; beat until smooth. Spread half of the topping over each rectangle. Bake 45 minutes or until topping is crisp and brown; remove from pan to wire rack. Cool completely.
Spread with Icing; sprinkle with nuts.
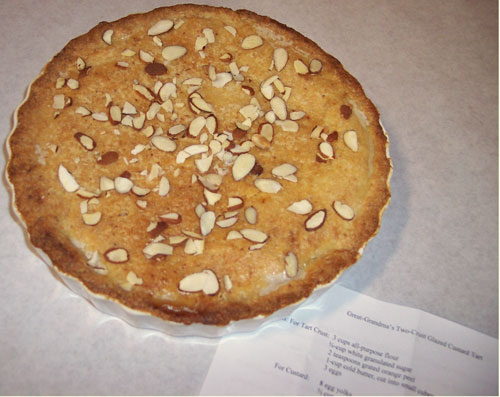
Great Grandma’s Double Crust Glazed Custard Tart (Image by Wanda Bain)
Great-Grandma’s Two-Crust Glazed Custard Tart
Marla F. Hyatt, Saint Paul, Minnesota
My mother taught me how to bake the old-fashioned way, from scratch with farm-fresh ingredients. She learned that way as a youngster at her grandma’s knee. This recipe is one of my favorites and just a little different from the traditional “topless” baked egg custards typical of the Midwestern Scandinavian desserts.
Great Grandma raised chickens and grandpa raised dairy cattle and grew fields of grain to feed the livestock and grind for flour at the local mill. They traded what they could for staples like sugar, fresh fruit and nuts that they kept fresh in the their root cellar. Mom often helped make four tarts at a time on Saturday for the family to take to church on Sunday morning to share after the service.
My mother grew up on her grandparent’s farm outside of Hillsboro, North Dakota. During the Great Depression, Great Grandpa and Great Grandma made a home for my grandparents and their youngsters for a few years. It was during this time my mother learned to bake this wonderful custard tart and many other family favorites. My mother carried her Grandmother’s recipes with her to Canada when her parents located there in 1933 to run a farmstead in Saskatchewan. My uncle, Thurston stayed with his grandparents in North Dakota to help them with the farm. My mother was nine years old and her parents needed her help with the young ones and the housework. Grandma and grandpa did not return to the US with my mother and the children until working conditions improved. By then, my mother was a teenager. She continued to bake this custard for Sunday church meetings until I learned to bake it in her place many years later.
In fact, Mom handed this recipe down to me when I was only six years old to bake for a school bake sale. This fall marks 52 years since I started making this special treat. I hope you enjoy it as much as our family has.
Great-Grandma’s Two-Crust Glazed Custard Tart
Marla F. Hyatt, Saint Paul, Minnesota
Ingredients:
For Tart Crust:
3 cups all-purpose flour
3/4cup white granulated sugar
2 teaspoons grated orange peel
1-cup cold butter, cut into small cubes
3 eggs
For Custard:
8 egg yolks
2/3 cup white granulated sugar
1 teaspoon grated orange peel
1-cup heavy cream
3/4 cup milk, scalded and only slightly cooled.
For Glaze:
1/2 cup powdered sugar – sift after measuring
3 tablespoons orange juice (or flavored liquor)
1/4 cup sliced almonds – toasted
Preparation: 1) Combine first 3 ingredients in large mixer bowl. Use a pastry blender or whisk to mix butter cubes into flour mixture to form coarse crumbs.
2) Beat eggs slightly in small bowl and toss into crumb mixture. Stir just until a dough forms. Cover and chill in refrigerator at least 1 hour.
3) Whisk egg yolks, sugar, orange peel and heavy cream together in the top of a double boiler. Add hot milk, whisking constantly. Pour 1-cup hot water into the bottom of the double boiler, Insert top and cook mixture over medium heat – whisking constanly until custard thickens and coats the back of a spoon thickly. Cover with plastic wrap or wax paper and cool to room temperature.
4) Roll out 2/3 of the pastry to fit the bottom and sides of a 9 or 10-inch tart pan. Pour the cooled Custard into the pastry lined pan. Roll out the remaining pastry dough and carefully place over custard filling. Seal the edges well. Pierce top crust with a fork or toothpick to make vents.
5) Bake at 375 degrees for 45 to 50 minutes until golden brown. Cool 10 minutes on rack.
6) Mix powdered sugar and orange juice together to form a glaze. Spread over the top of tart. Toast almonds in small frying pan over medium low heat – just until light golden. Sprinkle the almonds onto the top of tart.
Recipe makes one rich tart that will serve 8-10 people.